



Windows can account for approximately 10%–25% of a home's heating bill, according to the U.S. Department of Energy's Energy Savers guide. Learning how to cover windows for winter starts with separating two problems: cold air slipping around the frame and heat escaping through the glass.
A plush curtain can soften a room beautifully, but it won't repair a leaking sash. We recommend choosing each upgrade by what it stops, then checking that it's easy enough to use every day.
How to Cover Windows for Winter by Cost and Effort
Windows typically represent only about 10% of a home's surface area but can account for approximately 30–40% of winter heat loss, according to the U.S. Department of Energy's window-covering guidance. That mismatch is why fabric weight makes a poor ranking system. Judge each option by what it stops: air moving at the frame, heat conducting through the glass, or the chill a cold pane radiates into the room.
Each method does a different job. Weatherstripping blocks moving air at the sash. A cellular shade adds resistance right at the glass. A lined curtain puts a barrier between the room and the cold window surface. Match the method to the leak, because even a heavy covering insulates poorly against air passing straight around its edges.
Winter window methods compared by cost, time and impact
| Method | Typical cost | Install time | Warmth impact | Reusable |
|---|---|---|---|---|
| Draft stopper | Low; ready-made or fabric-and-filling cost | Place and adjust | Low; blocks floor-level drafts only, leaving sash and frame leaks untouched | Yes |
| Foam tape or V-seal weatherstripping | Low; sold by the roll | Clean, fit, then test sash movement | Moderate; cuts sash-edge leaks | Yes, while resilient and firmly attached |
| Clear plastic window film kit | Low; priced per window by kit coverage | Allow for cleaning, taping and shrinking | Moderate; adds a still-air layer across the opening | Usually replaced seasonally |
| Lined thermal curtain panel | Moderate; panel price plus rod, brackets and lining | Mount hardware, hang and adjust | Moderate; improves with close-fitting edges and full coverage | Yes |
| Ready-made cellular shade | Moderate; priced by width, height and operating system | Measure, mount brackets and test | High potential; honeycomb cavities resist heat transfer | Yes |
| Custom-sized cellular shade | Higher; quoted per measured opening and hardware | Measurement, fabrication and installation | High potential, with a closer perimeter fit | Yes |
| Removable interior storm panel | Higher; quoted per opening, glazing and attachment system | Fit channels or magnets, then check seal | High potential; adds glazing and a sealed air space | Yes |
Treat the cost column as a relative scale rather than a quote. Ask suppliers for a complete price that includes hardware, delivery, installation and any removal work; a panel-only price can conceal much of the project cost.
Spend on fit before decorative weight
A substantial textile hanging well away from the wall still lets room air circulate behind it, where it cools against the glass and spills back out at floor level. Look for lined construction, practical side returns and a rod arrangement that lets the covering close without leaving a broad central gap.
Daily use matters as much as insulation value. A perfectly fitted shade that stays raised because the cord tangles or the brackets flex saves nothing, so favour the option you will open and close every day.
For ideas on combining functional coverage with rich-toned, tactile furnishings, browse these cozy home décor ideas. Keep the window treatment operable rather than burying it behind furniture.
Buying rule: Pay for the detail that solves your problem. More fabric won't make an ill-fitting sash airtight.
How to Seal Drafts Before Covering the Glass
Seal moving air before adding an insulating layer. ENERGY STAR's sealing and insulating guide identifies caulk and weatherstripping as tools for smaller leaks and explains why insulation works better when air isn't passing through or around it.
On a cold, windy day, trace the sash, meeting rail, frame and trim with a smoke pencil. Incense can also reveal airflow, but keep its ember away from curtains, finishes and other combustible materials.
For help distinguishing frame leakage from other cold-window symptoms, Superior Home Improvement explains how to find the source of window drafts. Mark the leak locations with removable tape before starting repairs.
The sequence below keeps diagnosis ahead of decoration.
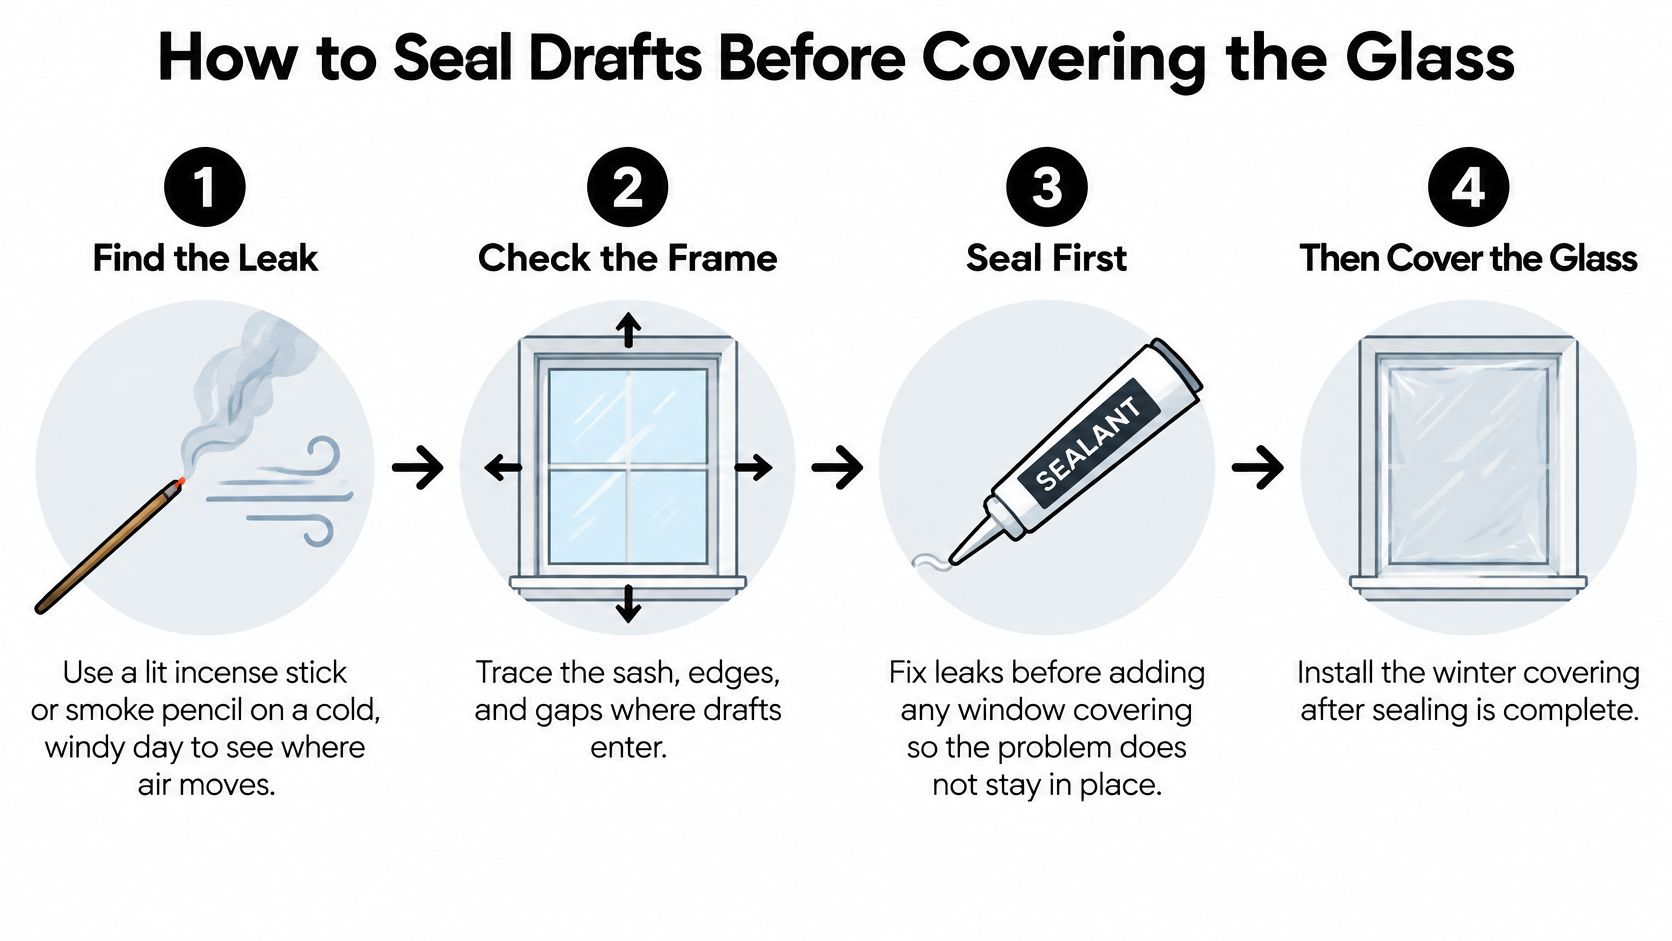
Prepare, seal and test
- Clean and dry the contact surfaces. Remove dust, loose adhesive and grime from sash edges and the frame. Applying tape over damp paint or loose debris creates a weak bond that can peel when the temperature drops.
- Weatherstrip the moving joints. Fit foam tape or V-seal where the operable sash meets the frame, choosing a profile that compresses without preventing closure. Don't stretch adhesive foam during application; it can pull back and leave gaps.
- Caulk stationary gaps. Use a sealant compatible with the frame and adjoining wall finish at fixed trim joints. Don't run caulk across a moving sash or apply a fresh bead over crumbling material.
- Leave drainage paths open. Identify weep holes and drainage slots before sealing. Blocking them can retain water inside the frame instead of directing it outdoors.
- Close and lock the window. The latch should engage without forcing the sash. If you have to lean hard on the frame, change the weatherstrip profile rather than accepting a window that won't close properly.
- Repeat the airflow test. Trace the repaired perimeter and check the corners carefully. Don't conceal a remaining leak behind film just because the surface now looks tidy.
Keep permanent sealants away from joints that must open for ventilation, maintenance or emergency escape. If paint or deteriorated timber prevents safe operation, resolve that before installing a covering.
How to Fit Thermal Liners, Cellular Shades and Film
Each covering needs a different installation method. Film relies on a continuous adhesive perimeter, curtains need controlled edge gaps, and cellular shades need accurate measurements without obstructing the window hardware.
Use the visual below to compare how different treatments sit against the opening.
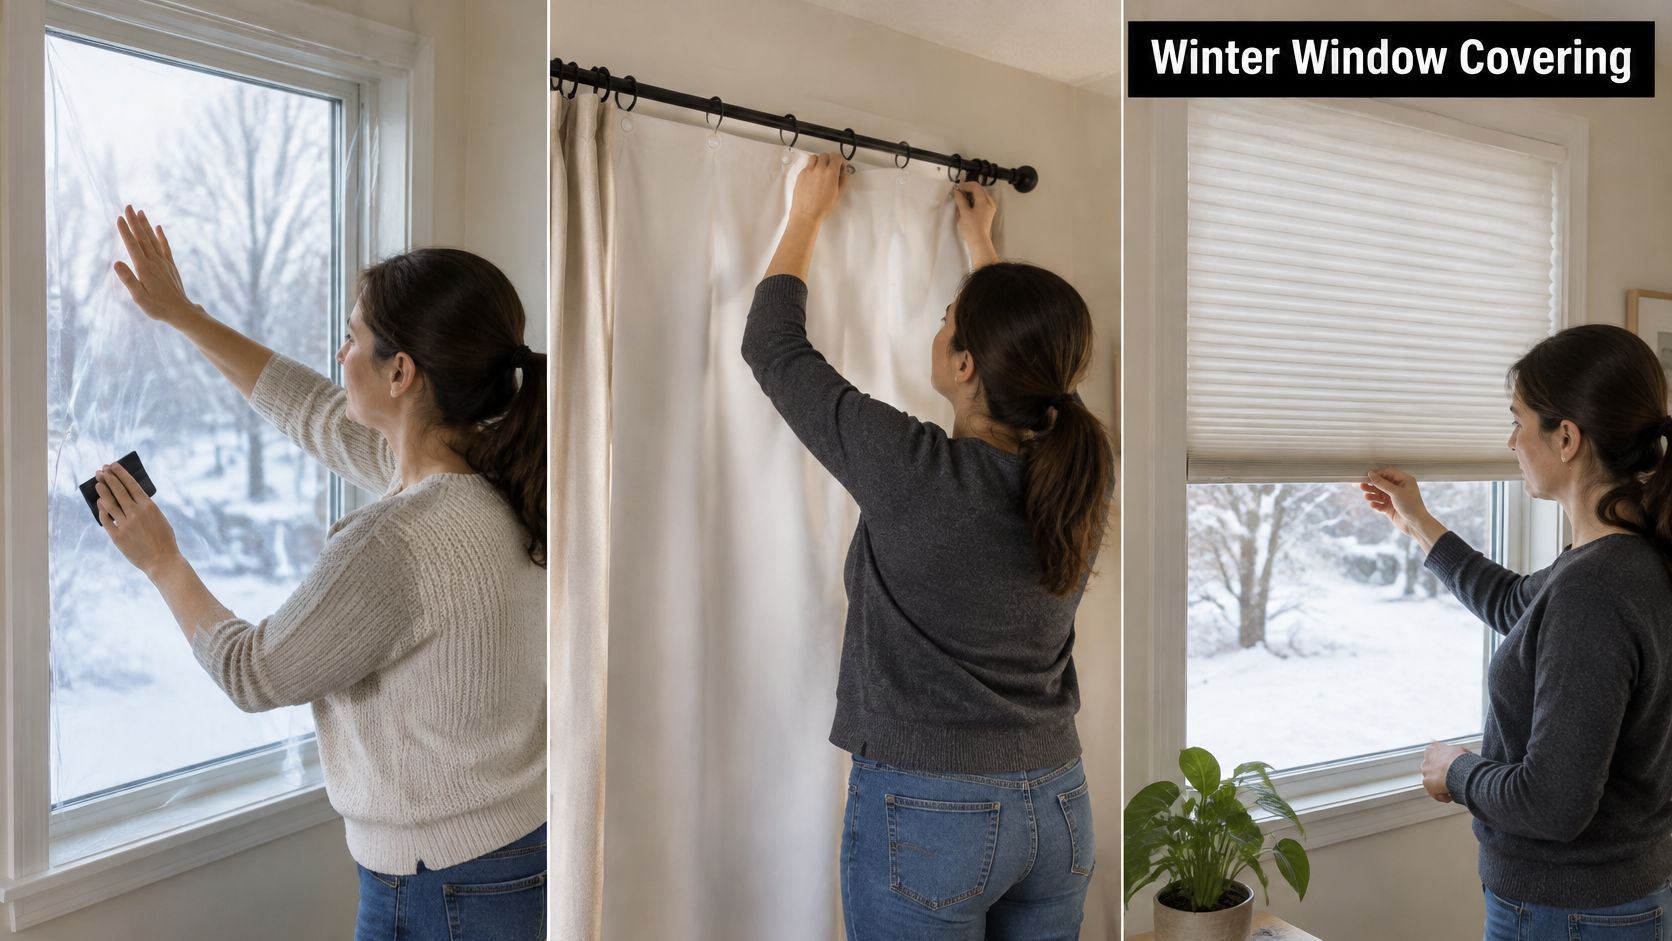
Clear shrink film
- Clean the frame where the kit's tape will sit, and let it dry completely. Test the adhesive on an inconspicuous area if the paint is fragile.
- Cut the film with enough surplus to handle it without pulling against the tape. Press the tape continuously around the opening, then attach the film without leaving breaks at the corners.
- Warm shrink film gently with a hair dryer, keeping it moving and away from the plastic. Trim excess only after the film is secure.
Don't spray a tape-mounted shrink-film frame with water. Wet-applied glass films are a different product; mixing the installation methods can undermine adhesion.
Thermal liners and curtains
- Position the rod above and beyond the opening so the closed fabric covers the frame and overlaps the adjacent wall. Use brackets suited to the combined weight of the curtain and lining.
- Choose tightly woven, lined fabric and arrange side returns where practical. Let the hem meet the sill or approach the floor without covering a heater.
- Close the panels and inspect the center join, sides and bottom. Adjust the hooks or rod position wherever a broad channel remains.
A velvety or plush surface adds tactile comfort, but pile isn't a substitute for a stable lining and good geometry. High-end faux fur and vegan fur can provide a cruelty-free luxury finish, yet they shouldn't be assumed to be weather-resistant, moisture-tolerant or suitable beside heat sources.
Explore these interior design textile ideas when balancing a luxury textile's drape, cleaning needs and visual weight.
This installation video offers another view of the practical work.
Cellular shades
- Measure the opening's width at the top, middle and bottom, and its height at both sides and the center. For an inside mount, record the narrowest width, then use the manufacturer's ordering convention so you don't deduct clearance twice.
- Check recess depth and bracket position. Handles, locks and inward-opening sashes all need unobstructed movement.
- Install the brackets level, clip in the headrail and operate the shade through its full travel. Check child-safety provisions and keep cords inaccessible.
Any bedroom covering must allow prompt access to the escape window. A beautifully fitted treatment that prevents the sash from opening is the wrong treatment.
Daily Open and Close Routine for Warmth
Open coverings when useful direct sunlight reaches the glass, then close them when that benefit ends, following the Department of Energy's winter energy guidance.
Daily open and close routine by time and window
| Time or condition | Action | Reason |
|---|---|---|
| Sunrise to mid-afternoon, south-facing windows | Open fully while direct sunlight reaches the window | Direct sun adds passive heat to the room |
| Before sunset | Close as the window loses useful sunlight | Reduces heat transfer once solar gain ends |
| Overnight, all windows | Keep closed, with edges neatly positioned | Maintains an additional insulating layer |
| Cloudy or freezing days | Keep closed when there's no useful solar gain; open as needed for daylight or moisture checks | Preserves insulation without treating outdoor temperature as the only deciding factor |
| North-facing windows, daytime | Keep insulating coverings closed when warmth is the priority, unless direct sun reaches them | Often little direct sunlight is available to offset heat loss |
Freezing weather doesn't automatically mean the curtains should stay shut. A sunny window may still contribute warmth, while an overcast window may provide welcome daylight without appreciable heating.
Make the routine easy to keep
Leave the operating cord, wand or panel edge accessible. If opening the curtain requires moving a chair and untangling fabric from a bedside table, the treatment is less likely to be used consistently.
For renters, a properly supported tension-rod liner can offer a reversible option without drilling. Check the rod's load rating and the condition of the reveal, and don't hang substantial fabric from a rod that slips under light pressure.
Browse these cozy bedroom décor ideas for ways to keep bedside furniture clear of working curtains. Bedrooms need both comfortable surroundings and straightforward access to the window.
A covering that's easy to move is usually more useful than an elaborate arrangement that stays in the same position all winter.
Condensation, Drafts and Other Common Problems
Tightly closed coverings can improve room comfort while leaving the glass colder and less ventilated. On older windows, especially in damp climates such as the Pacific Northwest, moisture may gather behind an otherwise effective curtain.
In a study of detachable secondary glazing, the tested system reduced measured heat flux by 30.4–34.1% and increased the indoor relative-humidity threshold for surface condensation by 15–26 percentage points, according to the published thermal and condensation performance study. That finding concerns the tested glazing system, not fabric coverings generally.
Winter covering symptoms, causes and fixes
| Symptom | Likely cause | Fix |
|---|---|---|
| Water beading on glass or sill | Humid room air meets cold glass behind a closed covering | Open the covering each morning, wipe away water and use exhaust ventilation while cooking or bathing |
| Mold line on the frame edge | Persistent condensation and poor air movement | Address the moisture source, clean the affected surface appropriately and allow the frame to dry |
| Cold draft at the side of a curtain | Fabric-to-wall gap or an unresolved frame leak | Determine whether air is leaking through the frame; repair that leak, then improve the curtain's side return |
| Film bubbles or peels | Dust, moisture, weak paint or unsuitable application | Remove failed material, prepare the correct bonding surface and reinstall using the kit's method |
| Window won't latch after sealing | Weatherstrip profile is too bulky or incorrectly positioned | Reposition it or replace it with a thinner compatible profile |
Treat moisture as a separate job
Opening the curtain helps the glass dry, but it doesn't remove the source of indoor humidity. Use kitchen and bathroom exhaust fans that discharge outdoors, and avoid drying wet laundry against a covered window.
For a broader household checklist, consult Engle Services humidity reduction tips. Persistent wet sills, soft timber or recurring mold need investigation rather than another decorative layer.
Keep soft furnishings away from damp frames. A plush throw belongs on a dry chair or bed, not wedged against wet glazing; explore these faux fur throw styling ideas for comfortable placements away from the problem area.
Moisture check: If the sill is wet, dry it and identify why. Don't shut the curtain and leave the water hidden.
Pick Your First Upgrade and When to Call a Pro
Match the first job to the complaint you can identify. Air you can feel moving calls for sealing work, because no curtain or shade performs as rated while a sash leaks around it. Discomfort beside a window that is airtight but still cold calls for an insulating layer instead.
- Drafts at the sash: Repair the moving-joint seal before buying decorative panels.
- Cold glass after sealing: Fit a well-fitted cellular shade, lined curtain or interior storm panel.
- Rental restrictions: Ask permission before using adhesives or hardware. A removable treatment still has to protect paint, drainage and escape access.
- Limited budget: Finish the most uncomfortable opening properly rather than spreading incomplete fixes across the whole house.
My advice is to pick the room where you spend the most hours and finish that window completely, seal first, covering second, open-and-close habit third. One window done in the right order teaches you more than five half-finished ones.
Know when the frame needs more than a covering
Call a qualified window professional for soft or rotting timber, fogging between double panes, leakage that persists after careful sealing, or historic and irregular openings that need specialist fitting. Stop using any attachment that obstructs emergency escape.
If replacement becomes the sensible option, SuperiorPRO's guide to energy efficient windows for Atlanta homes offers useful selection questions. Choose specifications for your own climate rather than assuming the same glazing works everywhere.
Measure your most exposed window, photograph the frame and hardware, and get an itemized quote before commissioning anything custom. Ask who handles measurement errors, how the attachment comes off and whether replacement seals remain available.
Once the practical work is settled, explore these maximalist bedroom ideas with faux fur for a warmer-looking room that keeps the window accessible. Rich texture belongs around a functioning window; a failing frame needs repair first.
At Pandemonium Millinery, founder Leigh Young and the Seattle studio team produce hand-sewn faux fur home décor in small batches, backed by over 25 years in the city's boutique fashion scene. Bespoke customization and precise adjustments mean a throw or textile piece can be finished to suit the room it lives in. Visit Pandemonium Millinery to explore cruelty-free luxury for your winter home, and contact the Seattle studio team to discuss a custom textile piece.


